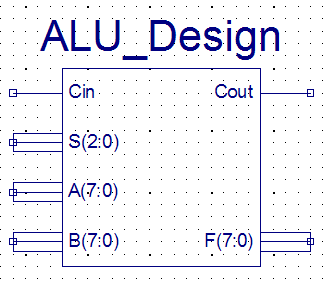
Create an 8-bit version of the
74x382 ALU
|
|
|
This code makes
it easy to verify the functionality of the ALU -- "How to
use" -- Download the .bit file to your kit and try:
1)
If the leftmost Dp and
Dig1:0 (the rightmost) flashes
does it mean that you can define A(7:0) with the
Sw(7:0)
Press <Btn1> in order to update => A = Dig1:0 = Dig3:2
2)
Press <Btn0> in
order to change input "Valg"
3)
If the next leftmost Dp and Dig1:0 (the rightmost) flashes
does it mean that you can define B(7:0) with the
Sw(7:0)
Press <Btn1> in order to update => B = Dig1:0 = Dig3:2
4)
Press <Btn0> again in order to change "Valg" for arithmetic
5)
When Dig3 flashes for arithmetic mode.
Use <Btn3> and <Btn2> to select S = 0..7
Use <Btn1> to toggle the Cin (watch Dp0)
6)
Press <Btn0> to start the process of watch/change A,B
|
|
|
| |
|
Last updated:
22-02-09 |
|

|
|
Function table for the
ALU_DESIGN |
|
S2 S1 S0 |
Function |
Cout |
|
0 0
0 |
F =
0000 |
0 |
|
0 0
1 |
F = B - A - 1 + Cin
|
F(8) |
|
0 1
0 |
F = A - B - 1 + Cin |
F(8) |
|
0 1
1 |
F = A + B + Cin |
F(8) |
|
1 0
0 |
F = A xor B |
not Cin |
|
1 0
1 |
F = A or B |
Cin |
|
1 1
0 |
F = A and B |
Cin |
|
1 1
1 |
F = 1111 |
1 |
|
|
|
|
|
|
|
|
|
|

|
Please note!
You doesn't have to understand the code below in
order to solve the task.
|
| |
 |
 |
 |
 |
The purpose of
this function will be the switch among the various
data for display.
Please note how "Valg" used.
The Clk_1Hz can be
used for the Flashing effect.
This signal will be 0 for say 500 msec and 1 for 500
msec.
The Blanking bits
do the trick.
|
 |
The basic idea in
this process is the implementation of a debouche
functionality and the ability of edge-detection of
more the on input.
This makes it
possible to increment, decrement and load values at
the same variables/signals.
|
| |
 |
| |
|
|
|
|
|
|
|
|
|
|
|
|
|
|
|
|
|
|
|
|
 |
 |
| |
|
 |
 |
| |
|
 |
 |
| |
|
 |
 |
| |
|
This how it's done in
9.2i -
The text editor chosen automatically in 10.1i |
Mark a field of text
and use the Comment / Uncomment commands
|
| |
|
|
|
|
|
|
|
|
